

Are you considering a home exterior upgrade that combines style, durability, and charm? Look no further than wood siding panels! This DIY guide will walk you through the essentials of installing wood siding panels, transforming your space while saving on labor costs.
Whether you’re a seasoned DIY enthusiast or a beginner, understanding the basics is key to a successful installation. In this comprehensive article, we’ll cover everything from the essential tools and materials you’ll need to the step-by-step process of installation.
Plus, we’ll discuss common challenges you might face and how to put the finishing touches on your new siding to elevate your home’s aesthetic appeal. Get ready to enhance your property with a stunning wooden facade – let’s dive in!
Understanding The Basics Of Wood Siding Panels Installation
Installing wood siding panels can be a rewarding DIY project that enhances the curb appeal of your home. However, to achieve a successful installation, it’s essential to comprehend the fundamental aspects of the process. Here, we outline key considerations that every DIY enthusiast should know.
First and foremost, it’s crucial to select the right type of wood siding. Common options include cedar, pine, and redwood, each offering unique aesthetic qualities and durability. Choose a wood that not only fits your budget but also complements the architectural style of your home.
When embarking on A DIY wood siding project, preparation is vital. This includes measuring the walls accurately and calculating the amount of siding needed, allowing for waste and mistakes. Ensure that the installation area is clean, dry, and free from old siding material.
Understanding weather barriers is another critical element. These barriers protect your home from moisture and should be installed beneath the wood siding to prevent rot and damage. Proper drainage is essential; ensure that your siding is installed with enough space from the ground to avoid water accumulation.
Additionally, proper installation techniques can greatly affect the longevity of your wood siding. Always refer to the manufacturer’s guidelines for recommended installation procedures. Using the right fasteners and spacing between the panels will also facilitate proper air circulation and reduce the risk of warping or buckling.
Consider finishing options. Treating the wood with sealants or paints not only improves its aesthetic appeal but also safeguards it from the elements. Regular maintenance post-installation, including cleaning and resealing, will prolong the lifespan of your wood siding.
By understanding these basic principles, you can embark on your wood siding installation project with confidence, ensuring a successful and visually pleasing outcome.
Essential Tools And Materials For A DIY Project
When embarking on A DIY wood siding installation project, gathering the right tools and materials is crucial to ensuring a smooth and successful process. Below is a comprehensive list of what you’ll need:
Tools
- Measuring Tape: For accurate measurements of your walls and siding boards.
- Level: To ensure your siding panels are installed straight and even.
- Circular Saw: Essential for cutting the wood siding to size.
- Nail Gun or Hammer: Useful for securing the siding panels in place.
- Drill: For pre-drilling holes, especially in harder woods.
- Utility Knife: Great for trimming edges or making minor adjustments.
- Safety Gear: Such as goggles, gloves, and a dust mask to protect yourself during installation.
Materials
- Wood Siding Panels: Choose high-quality wood that suits your aesthetic and durability needs.
- Flashing: To prevent water from entering between the house and siding.
- House Wrap or Moisture Barrier: Provides an extra layer of protection against moisture.
- Nails: Use corrosion-resistant nails suitable for exterior use.
- Sealants or Caulk: For sealing joints and edges to prevent water infiltration.
- Stain or Paint: If you wish to add a protective finish to your wood siding.
Having these tools and materials ready will help you tackle your wood siding installation with confidence and efficiency, making your A DIY project a resounding success.

Step-by-Step Process For Installing Wood Siding Panels
Installing wood siding panels can be a rewarding A DIY project that enhances the beauty of your home. Here’s a detailed step-by-step guide to help you through the installation process:
- Preparation: Start by cleaning the wall surface where you will be installing the wood siding. Remove any old siding, nails, and debris. Make sure the surface is dry and free from rot.
- Install a Vapor Barrier: It’s crucial to install a vapor barrier on the wall for moisture protection. This can be a house wrap or a plastic moisture barrier. Make sure to staple it securely to the wall.
- Measure and Cut Panels: Measure the height of the wall and cut your wood siding panels accordingly. Ensure that you allow for any overlaps and gaps required for expansion.
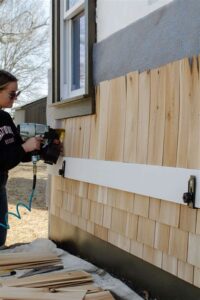
- Start From The Bottom: Begin your installation from the bottom of the wall. Place the first panel level, ensuring it is aligned properly. Use a level to confirm accuracy.
- Nailing the Panels: Secure the panels with nails, placing them at least 16 inches apart. Make sure to drive the nails in straight to avoid splitting the wood. Use corrosion-resistant nails for better durability.
- Continue Upward: Install the next panel above the first, ensuring it overlaps the lower panel as per manufacturer guidelines. Keep checking your level as you go up to maintain a straight and aligned installation.
- Cut Out Windows and Doors: As you reach windows and doors, measure and cut around these areas carefully. Make sure to leave a gap for trim, but do not overcut.
- Final Touches: Once all panels are in place, inspect for any gaps or areas that need caulking or sealing. This will ensure your siding is protected from moisture and air leaks.
- Finishing: Finally, apply a protective finish or stain to the wood siding to enhance its longevity and appearance. Follow the manufacturer’s instructions for the best results.
By following these steps, you can successfully complete your wood siding panel installation, maintaining the aesthetic appeal and structural integrity of your home.
Common Challenges In A DIY Wood Siding Installation
Embarking on A DIY project to install wood siding panels can be incredibly rewarding, but it also comes with its own set of challenges. Being prepared for these potential hurdles can make the process smoother and help you achieve the desired results. Here are some common challenges you might encounter:
- Weather Conditions: It’s essential to monitor the weather before starting your installation. Rain, high winds, or extreme temperatures can affect not only your comfort but also the quality of the installation.
- Measurement Errors: Precision is key when measuring and cutting your wood panels. Mistakes here can lead to wasted materials and extra work, so double-check your measurements before making any cuts.
- Material Selection: Choosing the right type of wood siding can be daunting. Different types offer various maintenance needs, durability, and aesthetics. Ensure you select the material that best suits your climate and personal style.
- Installation Alignment: Keeping the panels level and properly aligned throughout the entire installation is crucial to avoid unsightly gaps or misalignment. Consider using a chalk line to establish a straight baseline.
- Fastening Techniques: Using the correct fastening methods is vital to ensure your siding stays secure. Incorrectly installed fasteners can lead to issues like warping or loosening over time.
- Finishing Processes: Properly sealing and finishing your wood siding is necessary to enhance its longevity. Apply the appropriate treatments according to the manufacturer’s guidelines, and don’t rush this step.
By anticipating these challenges and planning accordingly, your A DIY wood siding installation can be a successful and satisfying endeavor. Stay informed, be patient, and methodical in your approach to overcome these obstacles effectively.
Finishing Touches To Enhance Your DIY Wood Siding Aesthetic
Once the wood siding panels are securely installed, it’s time to focus on the finishing touches to really enhance the overall aesthetic of your project. These details not only elevate the visual appeal of your home but also add durability and protection to your wood siding.
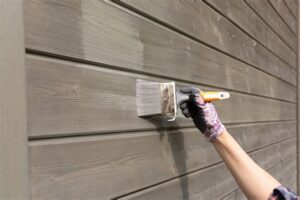
1. Stain or Paint Your Wood Siding
Applying a quality stain or paint is crucial when it comes to protecting your wood siding from the elements while also enhancing its appearance. Choose a color that complements your home’s architecture and your personal style. Make sure to use exterior-grade products designed for wood surfaces for the best results.
2. Trim and Molding
Adding trim around doors and windows can provide a polished look to your wood siding. Consider using corner boards and fascia boards to create clean lines at transitional areas. These elements can also help to hide any imperfections at the joints.
3. Caulking
Sealing gaps with caulk can prevent moisture from penetrating behind the siding, which is essential for long-term durability. Use a paintable exterior caulk that is compatible with wood and apply it where the siding meets trim, windows, and doors.
4. Add Decorative Elements
Consider incorporating decorative features such as shutters, decorative brackets, or trim details. These enhancements can add character and charm, making your wood siding installation truly unique.
5. Landscaping Considerations
Don’t overlook the impact of landscaping on your home’s exterior. By planting shrubs, flowers, or trees appropriately around your home, you can create a beautiful setting that highlights the beauty of your new siding while providing additional moisture control.
Focusing on these finishing touches will greatly enhance your A DIY wood siding aesthetic, giving your home a refined and appealing look while ensuring its longevity. Taking the time to finalize these details can make all the difference in achieving the result you desire.
Frequently Asked Questions
What materials do I need for installing wood siding panels?
You will need wood siding panels, nails or screws, a level, a tape measure, a saw, a hammer or drill, caulk, and a ladder for installation.
How do I prepare the wall before installing wood siding?
Start by cleaning the wall surface, ensuring it is free from debris, and repairing any damage. It’s also important to install a moisture barrier if necessary.
What is the best way to cut wood siding panels?
Using a circular saw or hand saw is recommended for cutting wood siding panels, ensuring straight and clean cuts for proper fitting.
How should I install the first row of wood siding panels?
Begin by marking a level line on the wall at the bottom of the first row. Align the first panel with this line, securing it with nails or screws, and make sure it is level.
How do I ensure proper spacing between wood siding panels?
Leave a small gap (typically around 1/8 inch) between each panel to allow for expansion and contraction with weather changes.
Is there a specific order for installing wood siding panels?
Yes, start from the bottom and work your way up, ensuring each row overlaps the one below for better water resistance.
What maintenance tips can I follow for wood siding after installation?
Regularly inspect the siding for signs of damage or wear, clean it with mild detergent, and repaint or re-stain as needed to protect the wood from the elements.
Leave a Reply